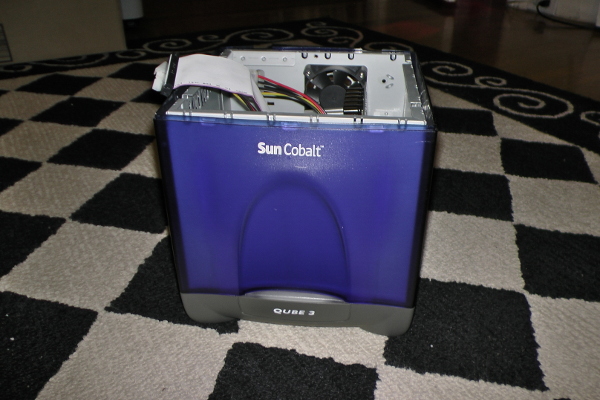
If some gorgeous thing plagues your life for three whole weeks, depriving you of sleep and sanity, it’s either an ex-boyfriend or a Cobalt Qube. I’ve wanted one of these for years — I mean look at it, who wouldn’t want such a beautiful computer in their house? But the expense was always a sticking point for me, even long after the Qube computers were current, until recently I spotted old Qubes going for about $70 on eBay. Ka-ching. Pick me up a cheap Qube, whack Debian on a hard drive, and Bob’s your aunty — adorable home server. Or so I thought. Little did I know that I was getting myself into three long, hard weeks of boot hell, kernel compiling, and painstaking upgrades.
But first, a little background. The Qube 3 is a square-ish computer designed as an easily configurable server with a web admin interface. The earlier models ran MIPS processors, but the Qube 3 runs an i586 AMD K6-2 processor. I gather they shipped different configurations of the machine, but the highest speed they sold was 450 MHz. My home server has been happily chugging along on a Sheevaplug for ages, but I’ve been irked for a while by the fiddliness of having the OS on an SD card, the lack of grunt of the 1.2 GHz ARM processor, and the fact there’s no good place to stick a hard drive. I thought, if I’m going to have a shit home server, it may as well be a cute one. I’ve determined that about the most modern release of Debian this is ever going to run is Debian Wheezy (still technically supported, but not for much longer). The process of upgrading the Qube to run something semi-modern is not straightforward, and this guide is for all you (one? two?) intrepid archaeonauts who want to make the best of beautiful old hardware.
Hardware Upgrades
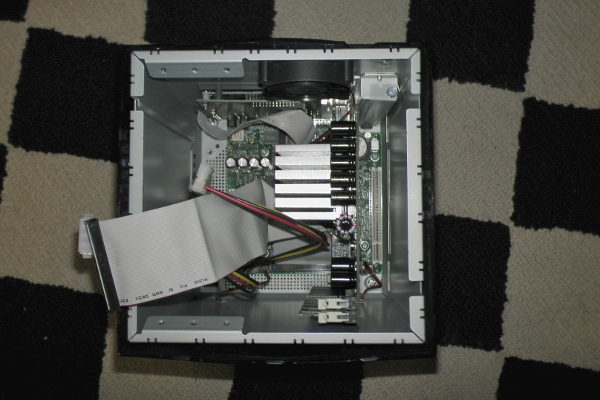
Yes, you heard it here first. Raise that RAM to the mother-lickin’ roof. Mine came with a 64 MB stick of RAM, but you can upgrade it to a max of 512 MB. Do it! Grab some off eBay, stick it in, and boot it up. Amazingly, this was the only straightforward part of the upgrade process.
The CPU was held down by a tall, silver heatsink that did not want to budge. The clamps holding it down were merciless, and the thermal paste had hardened so much I thought the heatsink might actually be glued on. After prying at the damn thing with screwdrivers, I finally managed to free both the heatsink and the CPU without damaging the motherboard. Turns out the CPU that came with it was an AMD K6-2+ (450 MHz). Well I thought we can do better than that, so I popped on eBay and nabbed a 500 MHz K6-2+. That’s a performance boost of like… a ninth? Bonanza. Only when I booted, the ROM kept telling me the thing was only running at 450 MHz, or thereabouts. Turns out the jumpers for selecting the CPU speed aren’t actually jumpers at all. They’re resistors soldered onto the damn motherboard, under the CPU if you please.1 Well I’m not taking a soldering iron to my motherboard for 50 MHz, so I guess I’ll stick with 450.
Now let’s talk hard drives. The Qube has room for two IDE hard drives, but the controller only permits a maximum size of 137 GB each. So far I haven’t had any luck replacing the 20 GB drive that came in the box. The first 120 GB drive I got off eBay was actually a mis-advertised 160 GB drive, and the second one I bought got delivered to Anchorage, Alaska. I live in California. I do, however, need something with at least a terabyte as a secondary drive so I can stream my music collection and run a small backup server. The Qube has one free PCI slot, so I bought a SATA controller card that has so far done nothing but throw “lost interrupt” errors and has prevented the machine from booting, so screw it. My 1 TB drive is currently connected with a SATA-to-USB adapter to the USB 1.1 port at the back of the machine. I’ve bought a USB 2.0 PCI card with an internal port, so hopefully that will give me slightly zippier storage.
The ROM
The Qube has a slightly bizarre boot process that’s going to inhibit everything we do from this point on. As far as I can tell it doesn’t load from the hard drive’s bootloader. It boots a minimal Linux kernel from its own internal ROM, which it then uses to load a secondary kernel from the hard drive. If it can’t load the secondary kernel, it will actually boot the OS using the ROM kernel. Being from 2002 the ROM kernel is version 2.2 (or something equally archaic) and won’t recognize an ext3 filesystem, but when Sun stopped supporting the Qube they open-sourced the ROM code and some enterprising developers made their own improvements.
You’ll want to grab the flashtool and latest ROM from the Cobalt ROM project. For the Qube 3 the appropriate ROM is cobalt-2.10.3-ext3-1M.rom.
-
Get yourself a serial-to-USB null modem cable and plug it into the serial port at the back of the Qube.
-
Boot the Qube while holding down the Reset Password button with a paperclip. This will enable the serial console.
-
From a Linux machine on the other end of that null modem cable, run:
sudo screen /dev/ttyUSB0 115200
You now have console access to the machine, and you’re going to be using this a lot.
-
We’re going to install a basic OS that will let us get started. The Qube supports netbooting, but fuck a lot of that, I’m going to use VirtualBox instead. Grab your hard drive and an IDE-to-USB adapter and plug it into your Linux machine.
-
Create a virtual disk mapped to your hard drive:
sudo VBoxManage internalcommands createrawvmdk -filename /home/user/woody.vmdk -rawdisk /dev/sdd
(or whatever your device is called)
-
Run VirtualBox (as root so you have access to that VMDK):
sudo virtualbox
-
Create a new virtual machine with your VMDK file as its drive.
-
Grab an installer for Debian 3.0 (Woody) from Debian’s CD archive and set that ISO as the virtual machine’s CD drive.
-
Install the hell out of Debian, being sure to use ext2 partitions. Don’t worry about package repos — not yet anyway. We just need a minimal machine to flash the ROM.
-
Shut down the VM.
-
Copy your flashtool and ROM onto the drive.
-
Edit the /etc/inittab file to enable the serial console. I had to comment all the lines that enable tty1, tty2, etc., and uncomment the line that gives you a serial terminal:
T0:23:respawn:/sbin/getty -L ttyS0 115200 vt100
Make sure you’ve set the baud to 115200 as well, because by default it’s going to be 9600.
-
Move the hard drive to the Qube and boot it.
-
Back up your original ROM:
./flashtool -v -r > original.rom
-
Flash your new ROM:
./flashtool -v -w cobalt-2.10.3-ext3-1M.rom
-
Reboot and make sure your new ROM kernel boots successfully. You should be able to boot into Debian Woody at this point, but don’t worry, we’re not leaving it there.
Upgrade the OS Kicking and Screaming
Update: There’s a new post over at Cobalt Qube 3: Part 2 with more up-to-date instructions on compiling the kernel and installing the OS.
The Qube just does not want to run a modern OS. This is partly because the i586 processor architecture is all but unsupported these days. Debian dropped support for this with Stretch. Jessie will still run on an i586, but because of the fact we need a kernel patched specifically for the Qube and I haven’t been able to find a kernel patch for any version beyond 2.6.36, the latest Debian that we’ll be able to run is Wheezy. Getting us there is going to be a chore. You might think you could just install Wheezy on a hard drive, boot it from the ROM kernel, and compile your kernel right there. Nope. Nope. Big bag of nope. Wheezy won’t even boot with the ancient ROM’s kernel. So what we need to do is install the latest bootable Debian and start upgrading from there.2
-
Install Debian Etch on the drive using your Linux machine and the same VirtualBox procedure as above. When asked to configure the package repo, you can specify the Debian archival repo at http://archive.debian.org/debian/.
-
Boot Etch in VirtualBox and install the dependencies we’ll need to compile a kernel:
apt-get install build-essential bzip2 kernel-package gcc libncurses5 libncurses5-dev bin86 gawk ncurses-dev initramfs-tools
-
Shut it down and copy to the drive all the Cobalt files we’ll be using. These consist of:
-
The 2.6.24 kernel source (Debian package):
linux-source-2.6.24_2.6.24-7_all.deb -
The 2.6.24 kernel patches for the Qube:
linux-2.6.24.3-cobalt3-tw.patch -
The 2.6.24 kernel config:
linux-2.6.24.3-cobalt3-tw.config -
An extra package needed for the 2.6.36 kernel:
kernel-package_12.036+nmu1_all.deb -
The 2.6.36.2 kernel source from Kernel.org:
linux-2.6.36.2.tar.bz2 -
The 2.6.36.2 kernel patches, long vanished but still accessible courtesy of the Wayback Machine:
linux-cobalt-2.6.36.patch -
The 2.6.36.2 kernel config from the same site as the patches, but with a few fixes from me:
2.6.36.2-3-cobalt-stj.config.txt -
ethtool for Debian Wheezy, which will help us get the network online later:
ethtool_3.4.2-1_i386.deb
-
-
Move the hard drive to the Qube and boot into Etch. We need to install a 2.6.24 kernel (but not greater) in order to upgrade to Lenny. After that we can install our 2.6.36 kernel.
-
Install the kernel source:
dpkg -i linux-source-2.6.24_2.6.24-7_all.deb
cd /usr/src
tar -jxvf linux-source-2.6.24.tar.bz2
mv linux-source-2.6.24 linux-source-2.6.24-cobalt3-tw
ln -s linux-source-2.6.24-cobalt3-tw linux
cd linux
-
Apply the Cobalt kernel patches:
patch -p1 < ~/linux-2.6.24.3-cobalt3-tw.patch
-
Copy the kernel config:
cp ~/linux-2.6.24.3-cobalt3-tw.config .config
-
Edit .config and set CONFIG_LOCALVERSION to “-cobalt3-tw”.
-
Prepare to compile:
make oldconfig
make-kpkg clean
-
Compile that mother! This will take a wee while. I’ve used the date as the revision number.
make-kpkg --initrd --revision='2018.05.15.1' kernel_image kernel_headers modules_image
-
The previous step resulted in two beautiful new DEB files in /usr/src. Install them now:
dpkg -i ../linux-headers-2.6.24-cobalt3-tw_2018.05.15.1_i386.deb ../linux-image-2.6.24-cobalt3-tw_2018.05.15.1_i386.deb
-
Create the vmlinux:
make vmlinux modules modules_install
strip vmlinux
bzip2 -c vmlinux > /boot/vmlinuz-2.6.24-cobalt3-tw.bz2
-
Change into the /boot folder and configure the newly generated boot files for the Qube by setting up the appropriate symlinks:
ln -s System.map-2.6.24-cobalt3-tw System.map
ln -s initrd.img-2.6.24-cobalt3-tw initrd.img
ln -s vmlinuz-2.6.24-cobalt3-tw.bz2 vmlinux.bz2
-
Reboot and make sure you’re now booting successfully from your 2.6.24 kernel (i.e. not falling back to the ROM kernel).
-
Move the drive to your Linux machine again and boot the VM. When GRUB comes up, you won’t be able to boot from your newly compiled kernel so just pick whatever came with Etch.
-
Upgrade Etch to Lenny by updating the release version in /etc/apt/sources.list and running:
apt-get update
apt-get upgrade
apt-get dist-upgrade
-
Boot the Qube again. It’s time to compile a 2.6.36 kernel.
-
For some reason it won’t compile without a newer version of kernel-package, so go ahead and install that from the files we transferred to the Qube earlier:
dpkg -i kernel-package_12.036+nmu1_all.deb
-
Unzip the source for the new kernel:
tar -jxvf linux-2.6.36.2.tar.bz2
-
Compile the kernel using the same steps we used for 2.6.24. I used the 2.6.36 patches I found on the Web. They came with a kernel config that didn’t entirely work with subsequent versions of udev that we’ll get to in a later upgrade, so I made some tweaks and you’ll want to use that. It’s going to take considerably longer to compile than the 2.6.24 kernel did, so leave it overnight.
-
When it came to linking the new initrd.img, I found the compiler hadn’t generated one for me. No worries, we can do it ourselves:
mkinitramfs -o /boot/initrd.img-2.6.36.2-cobalt.img 2.6.36.2-cobalt
Remember to remove the symlinks we previously created in order to link to the newer kernel.
-
Plug the hard drive into your Linux machine and boot the VM again.
-
Upgrade Lenny to Squeeze.
-
Upgrade Squeeze to Wheezy. Now you’re upgrading to a supported distro, so you can change your repo URL to a current one instead of the archive (e.g. http://ftp.us.debian.org/debian/). By the time you read this it may no longer be supported, in which case stick to the archival repo.
-
Boot the Qube again. We’re now running Wheezy — huzzah! But there’s some additional steps we’ll need to get a few things working.
-
I needed to run “depmod” to get the kernel to generate/load/whatever the appropriate modules. Without that everything was SNAFU’d.
-
Remove the ethernet device definitions that will contain the virtual network card from VirtualBox because that virtual card buggerizes things a bit:
rm /etc/udev/rules.d/70-persistent-net.rules
Don’t worry, this file gets regenerated with the correct settings when you reboot.
-
Install ethtool, which will help us get the network running properly:
dpkg -i ethtool_3.4.2-1_i386.deb
-
At this point I had a working OS, but no network! Turns out the OS tries to read the ethernet adapter as 100BASE-T when it’s only 10BASE-T, so we’re going to need to tell it what speed to use. Add this line to the end of the definition of eth0 in /etc/network/interfaces:
up ethtool -s eth0 speed 10 duplex full autoneg off
Update: Turns out it is, in fact a 100BASE-T adapter, but for some reason this version of Debian wouldn’t allow it to run that fast. It works fine in Slackware (see Cobalt Qube 3: Part 2).
-
Reboot — and there you go! Your own working, (semi-)modern Cobalt Qube 3 in only seventy million easy steps.
You’re welcome to go dickering with these steps — I’m positive there’s a lot of room for improvement, but I spent a long three weeks working these out by trial and error, so when I got to a working set of steps I wasn’t inclined to go screwing with it.
Where to from Here?
At the moment I’m quite happy with Wheezy. As of writing it’s still supported, so it has all the backports and security updates necessary to run a secure server. In the future I’ll probably wind up compiling more of my own software to keep it up to date. In terms of speed it’s not the flashiest thing in the universe, but it sure is the sexiest. I’m even running Subsonic on it to stream my music, and although the UI is a tad sluggish the MP3s are streaming flawlessly. Provided Subsonic doesn’t have to transcode anything, software really isn’t involved — the bottleneck is probably going to be the hard drive and ethernet speeds.
IMHO this is about as far as you’ll be able to upgrade the Qube without a newer kernel. I see no good reason the Qube shouldn’t be able to run Debian Jessie (the last Debian release to support i586) or the latest version of Slackware (still supports i586) if someone were able to patch a newer kernel, but that is waaaay beyond my level of expertise. Any volunteers out there? Can it be done?
Notes
-
A lot of source material on the Qubes is no longer online, so be prepared for a lot of links to the Wayback Machine. For the Qube’s processor hardware, see Martin Hoeffer’s blog. ↩
-
For the kernel compile steps I’m highly indebted to Installing Debian on a Cobalt Qube 3. It’s an excellent article with probably even more detail than I have here, but it was written in 2009 and there have been a lot of changes in Debian since then. ↩